Data Puke
Bounce Rate Puke
Avinash Kaushik is nuts.

Data Puke
Bounce Rate Puke
Avinash Kaushik is nuts.
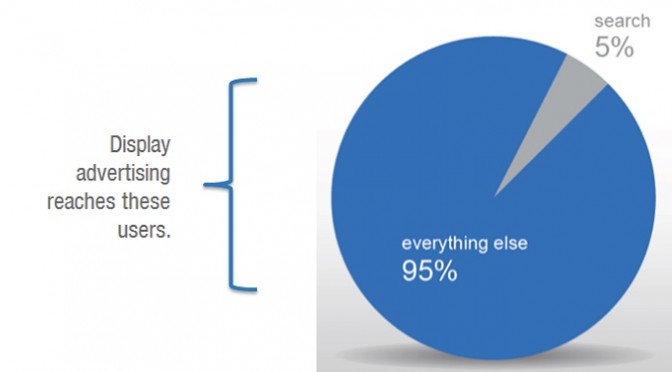
The Google Display Network is a very powerful tool to reach potential customers when they may not be aware or actively seeking your offering. However it behaves very differently than search especially in the realm of keywords.
A trap to be avoided is to start with search campaigns and simply copy the campaign and switch the network targeting. This is not the best way to create contextual keyword display campaigns as Google looks at total ad group themes to decide where to place the ads.
Secondly, there are keywords that you would rarely have in your search campaigns. Wide keywords that are loosely related to the product, have massive search volume, low conversion rates and high CPCs. All the things that make a performance search campaign under-perform. Not so in display. If Google looks at your ad group in its entirety and will match your ads to articles/content that are most closely related to the overall theme, then you need related keywords in your ad group to tell Google where to serve your display ads.
Think of ad groups as summary points of content. Your keywords are the bullet-points of all the key concepts within the article. Basically your campaigns will be made up of a number of ad groups each of which are mini synopses (yep that’s a plural) of the main points of the content you wish to target.

Another thing to consider is that keyword duplication across your account behaves very different to that of search. As we know, duplicate keywords in search can be a major cause of CPC inflation and poor performance. As before, this is not the case in display. In fact multiple instances of the same keyword across the display campaigns lead to different targeting outputs, as the combination of keywords within an ad group will vary.
So if you have 2 ad groups, one for Apple iPods and one for Apple iMacs, both ad groups can contain the keyword ‘apple’. Depending on your website, product range and objectives you can negate certain keywords from across ad groups, ie. add ‘ipod‘ as a negative keyword to the iMac ad group and vice versa.
Likewise keyword match type isn’t a consideration for positive keywords on the Google Display Network – all keywords are on broad match. However, negative keywords behave as they do in search campaigns.
So once you know how Google reads and serves ads on the Google Display Network you can enlist your creative powers to combine the top theme variations of the content you wish to serve your ads alongside. It’s a challenge to summarise the points of your ideal content mix. Choose key conversion or awareness focused keywords, depending on your campaign goals. Think: what are the 5 keywords that summarise the content I want to be associated with? What do the experts in this field talk about, what words do they use? It’s like reverse onsite keyword optimisation in the world of SEO – so think ‘what would I do if I were the Googlebot?‘
Then try differing combinations of keywords to test how ad group variations perform. Note: don’t just change one keyword, change the broader theme of the ad group from information to review keywords to purchase drivers etc. Change the philosophy of your targeting to test the results & performance.
Following on from keyword choice, structuring your ad groups and campaigns will allow for efficient and effective management of the performance. It’s recommended that ad groups are limited to between 1 and 50 keywords. I can’t emphasise enough how large ad groups are totally ineffective and un-targeted and should be avoided. Keep the ad groups to 1-10 contextual keywords.
The Display Planner allows you to estimate your search impressions and it is advisable to keep ad groups with lots of potential impressions in campaigns on their own so you can control the daily budget of the high volume ad groups. Secondly this allows your lower volume ad groups to serve without their daily budgets being affected by ad groups which spend a lot more.
By looking at display keywords as bullet points and ad groups as themes, you can test performance and serve Google Display ads more effectively alongside content that is more related to the topics you want to be associated with.
It’s very important to treat search and display campaign builds differently, ie. keyword choice, duplication and match types. Expected ad group traffic volume from available inventory should influence campaign structure, with high traffic ad groups being housed separately to lower traffic ad groups for budget reasons.
As with all digital advertising, testing is key. Try different keyword combinations, make sure there is sufficient difference between your ad groups for clearer test results; drive scale in what performs and pull back n what doesn’t.

The advanced targeting options in Facebook can offer a wealth of insight into your campaign’s target audience when analysing a campaign.
The real benefit of Facebook targeting is that members create profiles containing their age & sex so targeting is relatively accurate. As it’s a logged-in environment, these demographics can be served targeted ads/messaging with some accuracy every time someone logs into Facebook.
So we know that Facebook members can be segmented and targeted demographically, but ad serving is only the beginning of how this data can be used.
To get additional insight into your audience, it’s possible to analyse Facebook engagement data to show your most active segments. It is also very easy to present this in a meaningful & simple way using Excel pivot tables.
The first thing to consider with a general targeted campaign is that ads targets should be split by gender, then by age, then by device and finally by whether they are fans or not fans of your brand on Facebook already. Going on traditional gender/age demographic spits we should have 10 targets to begin, ie. men & women aged 18-24, 25-34, 35-44, 45-54, 55+.
At this point, we can add a device split by separating mobile & desktop devices. This is very important given that Facebook is accessed on mobile devices more than desktops, as a result targets will behave differently. Moreover this can have an impact on conversion, ie. if mobile is driving most traffic, a mobile-optimised website/conversion process will be key to driving success and revenue/leads. Another possible split (though not essential as it is more to do with ad formats than audience targeting) would be to target desktop right-hand column ads and newsfeed ads differently – this is not an issue for mobile as mobile only supports newsfeed ads.
Following this segmentation, targeting Facebook fans & non-fans allows us to see if the existing fanbase was more or less receptive to the messaging than non-fans.
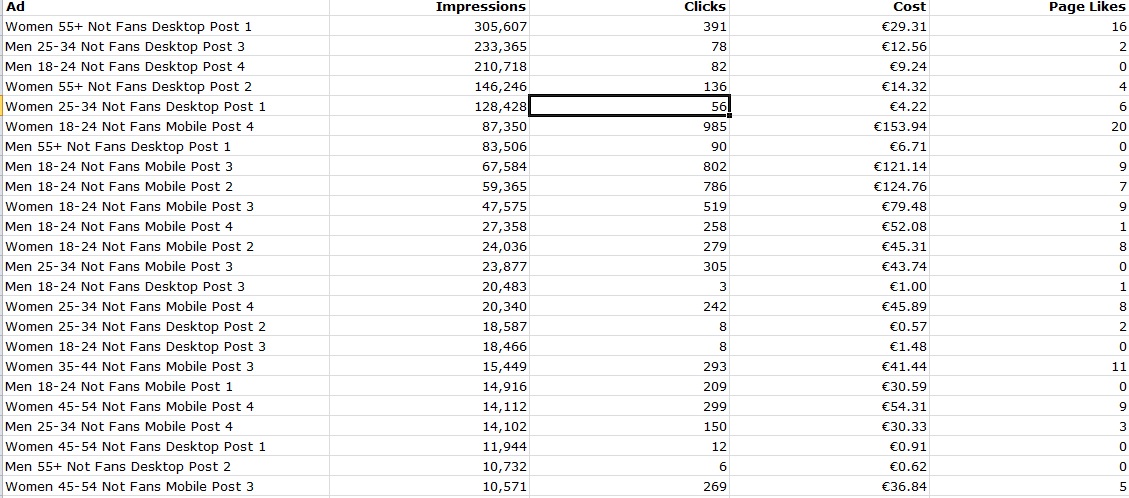
Each ad should be named after the targeting type for easy analysis on completion of the campaign, eg. “Men 18-24 Fans Mobile – Post 1” or “Women 35-44 Not Fans Desktop Post 9” etc.
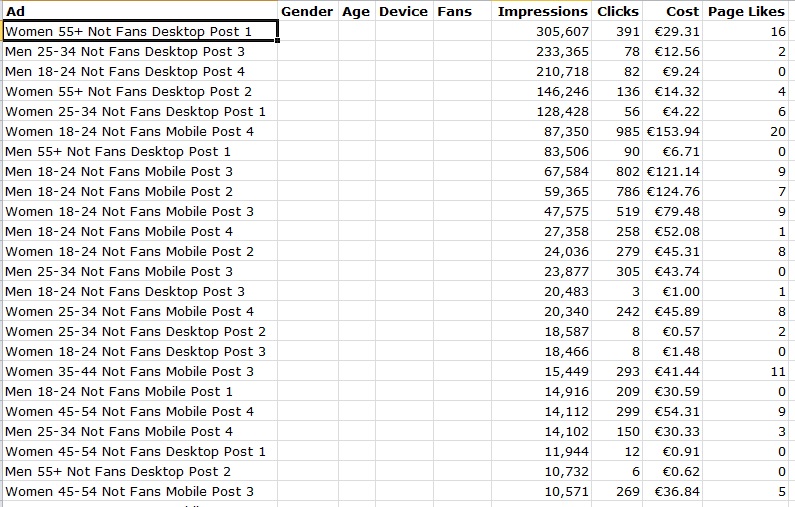 Using filters in Excel (CTRL+L) you can populate these extra columns with the appropriate data.
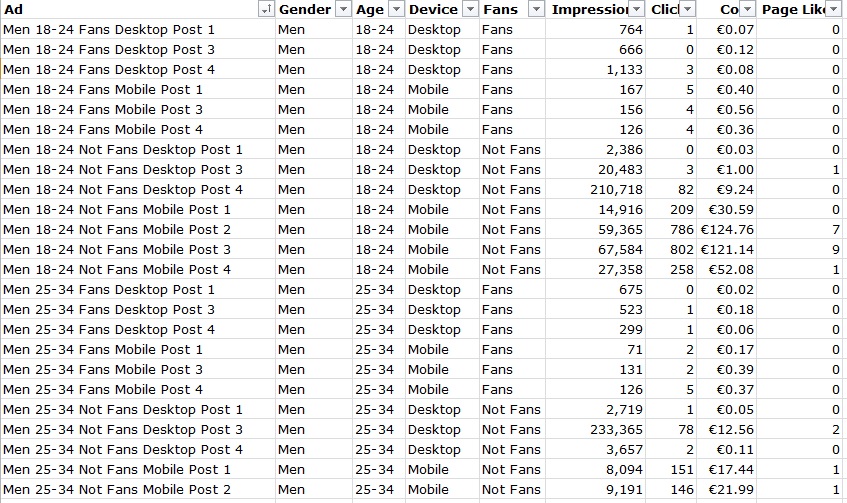
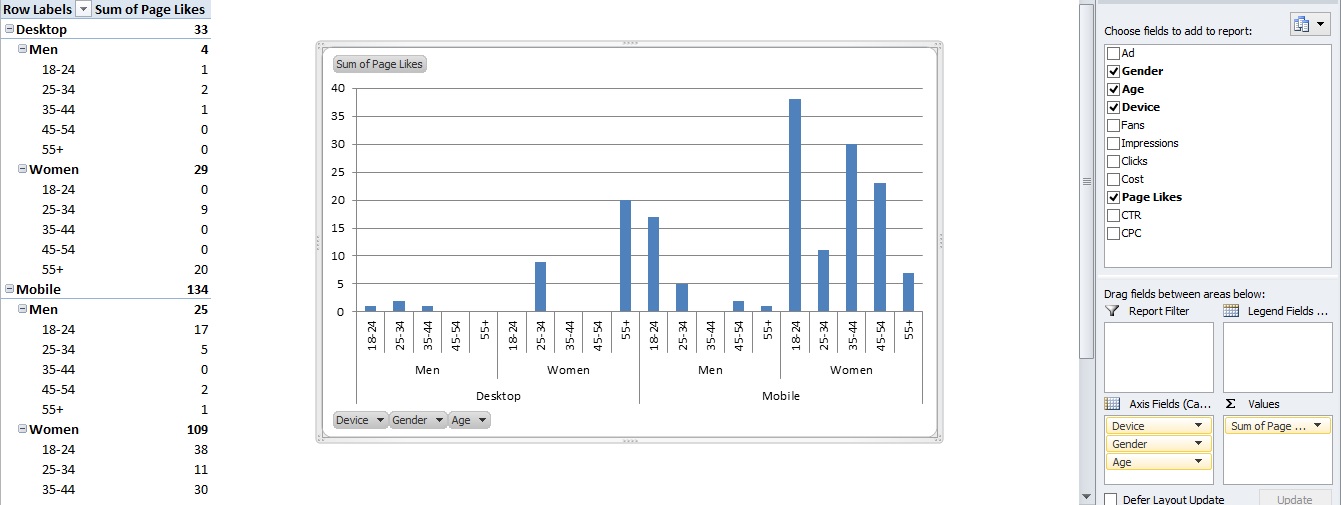
As pivot charts aggregate all of the data into categories, it is possible to see whether men or women liked your page, on what device and what their ages are.
It is also a good idea to pull different combinations of the targeting into the axis fields and change the metrics in the values fields to see if anything strange or interesting emerges.
Facebook offers excellent insight into audience engagement with brands on social media when data is aggregated using pivot tables.
By default, target your Facebook campaigns by age, device, gender and fans/non-fans. Name your ads after the targeting type. The real benefit of this set up is that you can analyse, in aggregated detail, using Excel pivot tables, how each segment performed. This can then inform decisions about future social strategies, set KPIs and target more effectively.
Secondly, though not wholly reliable, given that the data isn’t robust enough when compared to major research houses, these report outputs provide some audience insight. The caveat is that it is only insight into the Facebook audience which isn’t representative of an entire target audience.

One of the most powerful free tools in any digital marketers inventory is hidden away in the basement of Google. Released back in 2012, I’m amazed to hear that many people still don’t use Google Tag Manager.
Google Tag Manager gives you full control of what tags you can use on a website without ever having to contact a Webmaster to get it added! Here’s the official Google Video from 2012:
So, no more calling IT to get an AdWords conversion code, Google Analytics custom line, AdRoll Pixel or any other kind of hard-coded tracking implementation. Tag Manager allows you to add any tag to a website remotely, saving time and increasing flexibility with product innovations like Dynamic Product Listing Retargeting etc.
In actual fact, there is one piece of code to implement, then you’re in the clear. When you create a Tag Manager account you have to create what’s called a container. This is where the tags live. This container has an iframe tracking pixel which is pasted just after the opening <body> tag on every page of your website. There is no need to modify this iframe code just paste it on the site and it’s plain sailing to glorious tag-free shores.
Next thing is to set up the tags in the container. The interface is quite simple but there are a few unusual steps to take.
![]()
This is the tag manager pixel from my website. You may notice I don’t have a Google Analytics in the source code. You may have even thought, this guy doesn’t even use Analytics, what the hell does he know? Well, by using Tag Manager I’ve been tracking you just like everyone else who visits. This could be a good time to revert you to my cookie policy.
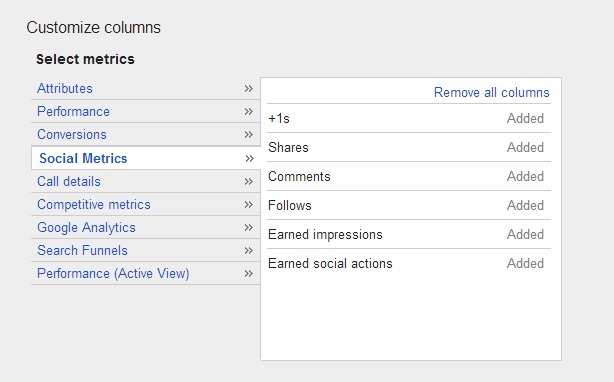
There are a number pre-defined tag options in Google Tag Manager including: AdWords Conversion Tracking, AdWords Remarketing, DoubleClick Floodlight Counter, DoubleClick Floodlight Sales, Google Analytics, Classic Analytics, Custom HTML Tags (very useful), Custom Image Tags, Event Listener, Display Ad Tracking, Other Remarketing Tags, Search Tags, Audience Tags and Other Analytics Tags. Many of these can be adapted and used in a more powerful way than their hard-coded variations.
Within the campaign tracking there are a number of override tag options which can help your campaigns with last click attribution. You can also increase the sample rate of your analytics data collection and site speed measurement.
Sample rates are very useful, as you’ll notice how site speed is usually calculated using a small % of overall website visitors. This isn’t ideal as the data isn’t robust enough to really drive any insight. Tag Manager goes some way to address this without having to hard-code this line: _gaq.push([‘_setSiteSpeedSampleRate’, 100]); You can simply increase the sample rate in the Tag Manager Analytics set up in the Advanced Configuration options.
This is the trouble, Webmasters are busy doing Webmaster things, they don’t really care about AdWords tracking codes or AdRoll pixels when their server is on fire. However there is a way.
Google will be pushing for a move towards Universal Analytics in the future. Though a date hasn’t been announced, this will most certainly happen once the remarketing functionality of Classic Analytics is available in Universal Analytics. What then? Google will push for Analytics migration. You can currently see this in the tracking code section of your Analytics properties.
So in order to test how Universal Analytics will run on your website before forced-migration, we must test the Universal Analytics code on the website. Enter Tag Manager.
Websites will behave differently using Universal Analytics. You must ensure that eCommerce tracking is working correctly amongst other things. Use Tag Manager to implement this migration test. Then you’ll never have to talk to the Webmaster again about codes. Well maybe to remove hard-coded legacy tags as you populate your Tag Manager container with these.
Google Tag Manager will change how quickly you control your campaign conversions and remarketing activities. It allows for enhanced tracking in Analytics and macros can pull additional data into what’s being tracked by the tags (macros need their own post to do them justice). Testing Universal Analytics migration is the best way to encourage your Webmasters to install Tag Manager. Once Tag Manager is installed you can remove legacy codes and then you’re free.

In December 2013 Google announced that they would be rolling out +Post ads, ie. Google Plus posts served on the Google Display Network and there hasn’t been much about it since.
However people are noticing social metrics column data appearing in AdWords of late and this links directly back to +Post ads. Does this mean that we are likely to see +post ads in the wild soon?
Google had allowed advertisers to sign up to the beta trial of +Post Ads and despite the form not leading to a ‘thank you‘ page on submission ( so you don’t know if your application was successful or it if errored out), the site did a job in explaining the new product.
As +Post Ads are displayed on the wider Google Display network and outside of the social media platform itself, it allows for far greater reach and audiences (Google Plus is a little barren). In essence it will turn the entire Web, well those websites with the appropriate adSense tags, into a readily updated social media news feed.
So not only is Google Plus a good thing to keep updated for your SEO efforts, it could ultimately encourage people to actively join and use the social network by exposing millions of people to good content on the display network.
It’s a shrewd move by Google to get the advertisers on board as a way to attract more active users and to monetise the platform. The integration with AdWords, as are being seen around the web, is the first indication that +Post Ads will be coming to a website near you shortly.